

The Magic of Kubestack
A Magical GitOps Framework for Terraform and Kubernetes


The Discovery
At work, we've been trying to decide how best to manage our Kubernetes deployments as we prepare to migrate to AWS.
Simultaneously, I was asking on Twitter about what kinds of cool Developer Experience (DevX) tools others were using. Philipp Strube commented recommending Kubestack for working with Terraform and Kubernetes.
As luck would have it, this sounded like a perfect solution for what we've been trying to solve at work and fit the bill for interesting DevX tools.
My interest was piqued.
What really is Kubestack?
Philipp's comment on Twitter got me excited because I am working with both Terraform and Kubernetes so I'm obviously interested in improving my developer experience around those tools.
But what does Kubestack really do?
The homepage claims Kubestack is: The best developer experience to build your Kubernetes platform
Reading over the rest of the Kubestack homepage I gather that it tries to solve the following problems:
- Allow testing and iteration locally before deploying them to the cloud.
- Provide confidence that locally tested configurations will be the same in staging and production.
- Combines managing both the Kubernetes cluster itself as well as the cluster services from one configuration.
Here is one paragraph from the homepage that particularly caught my attention:
The best teams use frameworks to develop better applications faster. Using a framework makes it possible to skip the boilerplate, and focus on what matters. But why do you still write infrastructure as code from scratch to automate your Kubernetes platform? Kubestack is the Terraform framework that we always dreamed of to define and maintain custom platforms stacks.
This all sounds fantastic!
Time to get my hands dirty and see how well this really works.
Learning Kubestack
The best place to start would probably be the official Get Started tutorial.
The tutorial is broken up into three parts:
- Develop Locally
- This section has you create a new Infrastructure-as-Code (IaC) repository and deploy it locally via Kubernetes in Docker (KinD).
- This seems like a great way to get familiar with the concepts before figuring out the cloud provider side of things.
- Provision Infrastructure
- This section goes over configuring your cloud provider in preparation for Kubestack to take over.
- The is also where we actually provision our infrastructure in the cloud.
- Set-up Automation
- The section is all about setting up the GitOps side of things so when you push changes they are automatically deployed to your cloud environment.
Before we get Started
Before we jump into the tutorial I want to clarify something.
This article will not be duplicating all the tutorial steps from the official site. Rather, it will document my experiences following the tutorial.
Additionally, I will be following the tutorial using Linux so take that into consideration when following specific advice about navigating any issues that may arise.
Finally, I'll be using Amazon EKS. That's what I'm trying to get familiar with at work, and I see no sense in confusing myself by trying to learn another cloud provider. I'll be creating a new account so I can use the 12-months of free tier EKS, EC2, S3, etc.
Alright, with that out of the way, let's dive in and learn about Kubestack...
Develop Locally
Develop Locally Tutorial Section
The first thing we had to do is get the kbst CLI. This is the tool we will use to scaffold the new IaC repository and deploy it locally.
At the time of writing this review, I am using the latest version which is
v0.1.5.
After downloading the kbst CLI and poking around the help command a bit. I continued the tutorial by using the CLI to scaffold a new repo for EKS. When I ran the command from the tutorial I got a log message that made me think something was wrong.
[jmaxwell@archie Dev]$ kbst repo init eks
2021/09/26 00:56:05 author field is required
I tried checking the help command again to see if something had changed in the CLI since the tutorial was written, but there wasn't anything useful there.
The time output is in UTC so don't get confused if it doesn't match your system time.
[jmaxwell@archie Dev]$ kbst help repo init
Scaffold a new repository

Usage:
  kbst repository init <starter> [flags]

Flags:
  -h, --help             help for init
  -r, --release string   desired release version (default "latest")

Global Flags:
  -p, --path string   path to the working directory (default ".")
After skimming ahead in the tutorial and comparing it with the directory the command created for me everything seemed to be there, so I'm not sure what that message means.
EDIT
After posting this article the author of Kubestack, Philipp Strube, reached out to me and informed me that the
author field is requiredmessage was due to my git configuration missing the author field. This totally makes sense since I was following this tutorial in a VM without my usual gitconfig settings.
Here are the contents of that directory after running that command.
[jmaxwell@archie Dev]$ kbst repo init eks
2021/09/26 01:10:48 author field is required
[jmaxwell@archie Dev]$ cd kubestack-starter-eks/
[jmaxwell@archie kubestack-starter-eks]$ tree
.
├── Dockerfile
├── Dockerfile.loc
├── eks_zero_cluster.tf
├── eks_zero_ingress.tf
├── eks_zero_providers.tf
├── manifests
├── README.md
└── versions.tf

1 directory, 7 files
[jmaxwell@archie kubestack-starter-eks]$
At this point, maybe it's my novice Kubernetes experience showing, but I would have like a bit of an explanation in the tutorial about what each of these files it created is for.
Here are my best deductions:
Dockerfile- This is using the kubestack/framework image, which from the DockerHub description, is just an image that bundles all the tools and dependencies needed for local and CI/CD deployments.
Dockerfile.loc- This is the same as above except it is using the KinD image (Kubernetes in Docker) for deploying locally.
eks_zero_cluster.tf- This is a Terraform config that configures the eks_zero module from the Kubestack repo. This appears to be a wrapper around interacting with various EKS options.
- This also defines three environments (Terraform workspaces?). They are
apps,ops, andlocand they inherit from each other in that order it seems. I'm most used to thinking about these asprod,staging, andlocalrespectively, but maybe these are just Kubernetes terms I'm not familiar with.
eks_zero_ingress.tf- This is another Terraform config that configures two modules this time; one to configure an nginx server and another to configure DNS. Most likely this will configure the reverse proxy and DNS settings that will allow us access (ingress) to our cluster.
eks_zero_providers.tf- This is yet another Terraform config, but instead of configuring modules, this is configuring 3 providers; "aws", "kustomization", and "kubernetes". The providers appear in the other module configurations as well, this seems to be setting their variables.
manifests/- This is an empty directory, that isn't mentioned in the rest of the tutorial.
- My guess is that this is where we would store any service configurations we want to deploy on top of the cluster once it's configured.
README.md- This README contains useful information for updating the cluster, defining services, and interacting with the intended GitOps deploy/promotion process.
versions.tf- This is a Terraform config that pins the versions of "kustomization" and "kubernetes" providers to
0.15in my case.
- This is a Terraform config that pins the versions of "kustomization" and "kubernetes" providers to
Ok, enough poking around, back to the tutorial.
Now we have to set some variables in the eks_zero_cluster.tf and eks_zero_providers.tf module configs.
For the cluster config, you need to set name_prefix, base_domain, and cluster_availability_zones. It looks like you can pick whatever you want for the first two (I picked kbst-tut and cctechwiz.com respectively), but you'll need to do some research on the AZs to find out which are correct for your region.
Speaking of the region, you need to set the region variable in the providers config.
This is where I got side-tracked for a bit. Since I'm following this tutorial at home, and not at work, I had to go create a new AWS account, configure budget reporting, and figure out all the region/AZ stuff. It makes sense that we need this information to deploy to AWS, but I didn't expect to need them in the "Deploy Locally" section of the tutorial.
I don't want to bloat this article with AWS Account creation and using the free tier. If you are interested in reading about that let me know in the comments and I'll write a separate post detailing those steps with some tips and tricks I've picked up.
For my use-case, since I'm living in the western United States, I selected the us-west-2 region which has the availability zones, us-west-2a, us-west-2b, us-west-2c, and us-west-2d, but I only used the first 3 in the configuration file.
With all that properly configured, we're ready to start the local development environment.
You start the local development environment with:
[jmaxwell@archie Dev]$ kbst local apply
And stop the local development environment with:
[jmaxwell@archie Dev]$ kbst local destroy
I appreciate that these use the same terminologies as Terraform does, which makes it easy to remember.
Observing the logs during this process it seems that this does a terraform init (which downloads all the dependencies), then switches into the loc workspace (which selects the correct subset of configuration options to use) and finally executes terraform apply (which actually creates the infrastructure, in this case locally in Docker containers).
I didn't see any errors during this process, which is great since I was still worried about the author field is required message from earlier. There were a couple of warnings in the logs, stating: Experimental feature "module_variable_optional_attrs" is active, but I'm not worried about those.
One thing I want to call out here is that
kbst local applyalso "watches" the configuration files for changes so it can automatically update the environment accordingly. This is mentioned in the tutorial, but only once in the comment line above where you are instructed to runkbst local apply. I mention this because I sat around for probably 5 minutes longer than I had to wait for the command prompt to return when that was never going to happen. Granted, it does print#### Watching for changesat the end, but either way just know that's what it's doing.
At this point, we should have a fully functional Kubernetes cluster running locally via KinD (Kubernetes in Docker). We can verify this by checking the docker containers that are running.
[jmaxwell@archie ~]$ docker ps
CONTAINER ID   IMAGE                                    COMMAND                  CREATED          STATUS          PORTS                                                                    NAMES
cff1fdb5c825   ghcr.io/kbst/kind-eks-d:v1.21.2-kbst.0   "/usr/local/bin/entr…"   12 minutes ago   Up 11 minutes   0.0.0.0:8080->80/tcp, 0.0.0.0:8443->443/tcp, 127.0.0.1:44433->6443/tcp   kbst-tut-loc-eks-45ed71b-control-plane
7752b64fb8d4   ghcr.io/kbst/kind-eks-d:v1.21.2-kbst.0   "/usr/local/bin/entr…"   12 minutes ago   Up 11 minutes                                                                            kbst-tut-loc-eks-45ed71b-worker
[jmaxwell@archie ~]$
Looks good, we've got our control plane node and one worker node.
Let's try making a change to our configuration to see what happens. I want to change the instance type from t2.small to t3.micro (since that's part of the 12-month free tier I signed up for). So if we open eks_zero_cluster.tf again we can make that change. After saving that file and switching back to the terminal I ran kbst local apply in, I watched it successfully re-apply the config and start watching for more changes.
This is magic. 🤩
Alright, let's destroy our new local Kubernetes cluster and wrap up this section.
The final thing the tutorial instructs us to do in this section is to add and commit our changes to git in preparation for provisioning in the cloud.
Provision Infrastructure
Provision Infrastructure Tutorial Section
The very first part of this section as us build and exec into an image based on the Dockerfile that was created for us by kbst repo init.
I create a Makefile with these instructions since I'm lazy and don't want to either type them out each time or open the tutorial page and copy them (I know this is only until we set up automation, but still...).
Here is my Makefile if you want to copy it:
#Instructions from: https://www.kubestack.com/framework/documentation/tutorial-provision-infrastructure#overview

.PHONY: docker-build docker-run

# Build the bootstrap container
docker-build:
    docker build -t kbst-infra-automation:bootstrap .

# Exec into the bootstrap container
docker-run:
    docker run --rm -ti \
    -v $(CURDIR):/infra \
    kbst-infra-automation:bootstrap
Now I can just run make docker-build and make docker-run instead of remembering those full commands each time.
Let's drop into our docker container to continue with the tutorial. You should see a command prompt like the following to know you're inside the docker container:
kbst@23f54a2cfb16:/infra$
Here is a quickstart guide for creating the information you need to run aws configure.
It is important to point out at this step you must select
jsonwhen prompted for theDefault output formatsince later steps in the tutorial expect you to have done that.If you did not select json, the easiest way to fix that is to run
aws configure set output json.Normally you could also just edit the config file directly (
./.user/.aws/confginside the Kubestack container) but there are no text editors installed in this minimal container.
Once the AWS CLI is configured the next step is to create the bucket that Terraform will use to store its state.
The tutorial mentions that the buckets must be unique so it appends a commit hash to the bucket. I copied and ran the provided script, then I realized I would have rather named my bucket after my repo (maybe with the commit still if needed). This is not a big deal, and I'm not going to change it for the tutorial, but I would be sure to modify the BUCKET_NAME variable if I were doing this for real production infrastructure. Having clear bucket names will help to track them down if I'm managing various infrastructure from separate repositories.
Anyway, time to see some more magic happen! Let's continue to bootstrapping the actual infrastructure.
The only thing I did in this section, that the tutorial didn't explicitly callout, was running terraform plan just to take a peek at the full configuration that was going to be applied for each workspace.
🤯 This is where the power and convenience of the Kubestack framework really dawned on me.
Seeing the sheer number of resources, policies, security groups, routing configurations, etc. that it took care of was crazy. It brought back many memories of painstakingly tweaking each individual one of these by hand via the AWS console when trying to get Terraform to provision even simple things like RDS instances by itself.
While you're waiting for
terraform applyto finish its job, let's chat about a couple of things I'm concerned with.At this point (from a "using this at work" perspective) I'm concerned with how easy it will be to tweak the module configs and allow Kubestack to use existing infrastructure components in our current AWS environment.
For example, I know our security and network folks have already configured the VPCs, Subnets, Routing Configs, etc. for different use cases. I also know they would for sure want me to use those rather than creating all new ones.
This will take some more time digging into the module configs to see how this would work. Maybe I will do a follow-up article once I figure that out.
—-
The next thing I'm concerned with is the S3 bucket that was created to store the Terraform state is configured to be a public bucket. For the tutorial, this isn't an issue, but for using this in production this might be a deal-breaker.
It DOES have an ACL that seems to restrict access to just the owning AWS account, and I was NOT able to access any of the
tfstatefiles publicly. But it would still be nice not to leave the bucket public if it doesn't need to be.Once I finished with the tutorial as written, I changed the bucket permissions to private to see if that broke anything with the deployment or automation steps. To test this, I just made a new branch and changed a couple of things in the cluster config then made a new PR. The PR pipeline passed, so I merged it triggering ops deploy, which also passed. Finally, I tagged main with
apps-deploy-1and pushed triggering apps deploy, that pipeline passed as well. Looks like the bucket can be completely private with no issues.
And back to our regularly scheduled programming...
After both terraform apply steps completed successfully I see my EKS clusters in AWS!

The final steps in this section are to configure the DNS records so you're new cluster names can be resolved, and committing your changes.
It took me a moment to figure out what I needed to do to configure the DNS based on the tutorial, so he's some quick pointers based on my config and DNS provider, which is Namecheap.
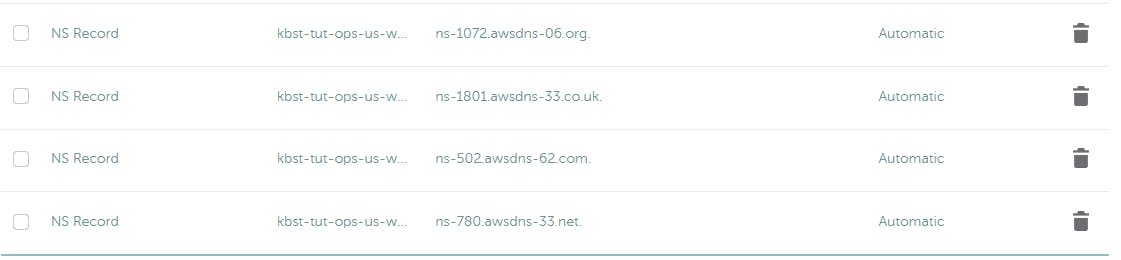
The important part of the output from the commands you execute to get the NS information looks something like this:
    name          = "kbst-tut-ops-us-west-2.aws.cctechwiz.com"
    name_servers  = [
        "ns-1072.awsdns-06.org",
        "ns-1801.awsdns-33.co.uk",
        "ns-502.awsdns-62.com",
        "ns-780.awsdns-33.net",
    ]
I then took the part of the name before my domain, kbst-tut-ops-us-west-2.aws, and created an NS record for each of the name_servers entries.
When it was done it looked like this:
Now when I run the dig NS command from the tutorial I get the expected results:
;; ANSWER SECTION:
kbst-tut-ops-us-west-2.aws.cctechwiz.com. 172800 IN NS ns-1072.awsdns-06.org.
kbst-tut-ops-us-west-2.aws.cctechwiz.com. 172800 IN NS ns-1801.awsdns-33.co.uk.
kbst-tut-ops-us-west-2.aws.cctechwiz.com. 172800 IN NS ns-502.awsdns-62.com.
kbst-tut-ops-us-west-2.aws.cctechwiz.com. 172800 IN NS ns-780.awsdns-33.net.
Just rinse and repeat for the -apps name servers and you should be good to move on to the next section of the tutorial, automating the deployment.
Set-up Automation
Set-up Automation Tutorial Section
In this section of the tutorial, we create a Github repository to store our Infrastructure as Code. Then we set up secrets in Github with our AWS credentials for the CD pipeline to use. And finally, we build a Github Actions pipeline to automate deploying our infrastructure changes to AWS when we push to a branch or tag.
I didn't experience any issues or oddities with this section just smooth sailing.
There are some things from the pipeline config that could be cleaned up if you want. In my case, I would remove all the ENV vars that refer to Azure or Google Cloud since I'm only interested in AWS, but for a tutorial config, this totally makes sense.
So the overall GitOps workflow here is;
- Pushes to a PR branch will trigger Terraform
initandplanstages so you can catch any issues you might have missed with yourlocdeployments. - Then, PR merges to the main branch will trigger
opsdeployments. - Finally, when you tag main with
apps-deploy-#it triggers anappsdeployment.
Pretty simple. Just like it should be. I love it. 😍
Final Thoughts
Overall I'm very impressed with the Kubestack framework. I can definitely see that there is an improvement in developer experience over working with Terraform and Kubernetes without it.
My recommendation: 👍🏻👍🏻 Definitely give it a try, you'll probably love it too!
I'm going to need to play with it some more with regards to integrating it into our processes at work. But I'm excited to tackle that because I think it will be a really great change to how we work.
That wraps up my Kubestack review. The next steps for me will be introducing this to the folks in charge of our production EKS clusters and get their feedback.
What are your next steps? Let me know what you think about Kubestack in the comments, or feel free to ask any questions you might have and I'll try my best to answer them.
Until next time, be kind to yourself and others, and keep learning.